In this blog post I will shed light upon how to branch,fork and making a pull request in Github.
Disclaimer: I am not a subject expert on git and I am sharing my findings as I learn more about this myself.
Prerequisites:
Before reading this post on forks and branches I want you to be thorough with the basics of Git.There is a lot of good content in the Internet regarding git and I have my own content here. So give it a read before proceeding.
After reading about git and other basic functionalities in git , a noob may come to a conclusion that github is just another online cloud where you can store computer code and access them whenever and wherever he wants it. No it’s more than that.Branches and forks help people to collaborate on the work they do.
What is a branch
Branches in github are used for intra repository collaboration.It is highly helpful when a large number of people are involved in a bigger project and the work is divided more or less equally between the collaborators.The default and the only working branch in a newly created repository is the master branch.
Maggi time
Asha is preparing maggi for dinner.Her daughters Kalpana and Anita help her to add flavour and taste to the noodles. Kalpana takes some of the maggi and adds masala attached with the pack to the maggi. She tastes it and asks Asha to accept the change. Anita takes some of the maggi and adds the freshly cooked and cut vegetables to it.Like Kalpana , Anita also proposes a change to the recipe and asks Asha to accept the change.
Asha tastes them separately and decides whether they can be applied to the full maggi pack.If she accepts the change the flavours are added and the food is prepared. But if she rejects it then the flavours are not added and the daughters can do whatever they want with their own bowl of maggi with the flavours added.
A typical branching scenario
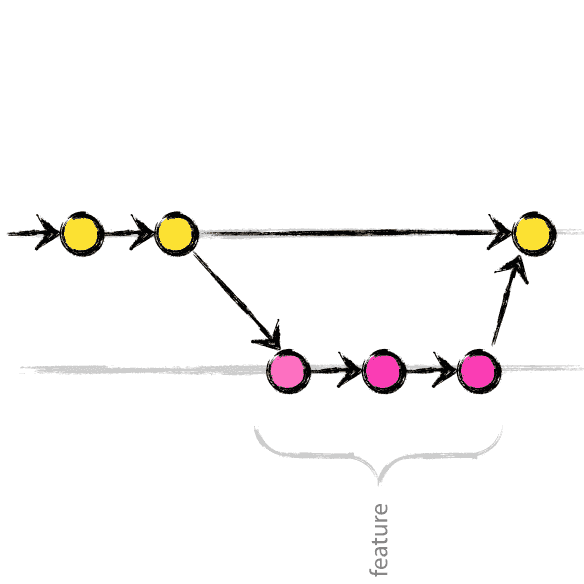
Branches are very helpful when there is a group project and multiple collaborators are involved.The master branch contains the main workflow.The collaborators are consulted and the whole project is divided into multiple sub tasks with each member getting a small task.Each member then creates a separate branch of their own , make changes to the code and run and test them.When they feel that their subtask is complete and all the features are implemented , they ask the master to merge their branch to master branch.The master receives multiple merge requests since there are multiple collaborators involved.He checks each and every branch and merges them.If there is a bug while merging a branch then he sends it back with necessary comments to make the change and he doesn’t merge that branch.
Maggi and Git
What a boring story , huh? But I am sure every girl reading this post would have made these kind of helps and I request you to continue doing them. In the maggi example, the entire maggi pack that Asha had was the master branch. Kalpana & Anita made their own branches from the master maggi branch and made changes to them. The changes made in the branches are independent of each other and also the master branch.
After adding some changes to their branch they would ask Asha , whether the changes can be merged to the master maggi branch she had. Asha will check whether the addition of branches to the master branch would be helpful and merges them independently.
Creating a branch
Let’s talk some git here. You can create a branch in the current project and work on it by following this easy procedure.
- Branch selector menu
- Git command
Navigate to the main page of the repository. Click the branch selector menu and type a name for the new branch and press enter.
Open the terminal and type the following command to clone the entire repository and change the current working branch to the newly created branch.
git clone -b branchname remoteurl
Now you can start working on your branch. After making some changes and tweaking the code to make it work , you can push it online using the following command.
git push origin branchname
Merge
Merging branches is very important and the project leader must be very careful before merging branches.In the main page of the repository click compare to compare any two branches. The leader can see the additions and deletions with the numbers associated with them.He should test the code before merging. After checking for any nasty or little bugs , he can click merge and the branches will be merged.
What is a Fork
Forks in github are used for inter repository collaboration.After forking and improving the code , a pull request is made and the owner of the original repository accepts the pull request and the new changes are reflected in his code.
A fork is a copy of a repository. Forking a repository allows you to freely experiment with changes without affecting the original project.Most commonly, forks are used to either propose changes to someone else’s project or to use someone else’s project as a starting point for your own idea.
A typical forking scenario
Aashika is working on the latest assignment her mam gave in the class. Sushmitha is a friend of Aashika and is also from the same class.Aashi being a perfectionist completes the job and open-sources her homework notes for everyone to copy. Sush forks a copy of Aashi’s notes.She thinks she would get additional marks if she writes some extra points and corrects some inaccuracies in Aashi’s notes.So she makes those changes and tells Aashika those changes.Sushmitha basically proposes a pull request to Aashi’s original notes.Aashika accepts those changes and improves her notes.
IMPORTANT NOTE : The changes made in the original repository are not reflected on the forks automatically.Suppose if another girl Bhargavi copies the homework from Aashika at 8PM and goes to sleep , Sush adds something and submits a pull request to Aashika at 9PM then Bhargavi would have had only the previous version of Aashi’s notes.There are git commands to sync your forked repo with the original one but it is beyond the scope of this article.
Forking a repository
Steps to fork a repo
- Navigate to the repository you want to fork
- Click on the fork icon
- FORKED!
After forking is done , navigate to your profile and you would find a copy of the repository in your profile.You can play with it and do whatever you want with it.
Pull request
After making changes to the code in your profile , do the following steps to submit a pull request
- Navigate to the repository in your profile
- Click New Pull Request
- Choose the repo and the branch you want to compare and submit the pull request with a message.
After submitting the pull request , the owner of the original repo will review those changes and accepts those pull requests.
Acknowledgements
Ramkumar , Ganesh and Shri Shruthi were kind enough to teach me the basics of vcs and git. Without them I wouldn’t have had the courage to take up git and learn its basics.
Thanks for reading!
comments powered by Disqus